
 The second silver project I did at Amalgam Arts Atlanta was a bezel set pendant. I did not get all the pieces in time to attempt the spider pendant and I figured it wouldn't hurt to start with something fairly simple.
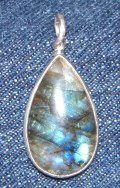
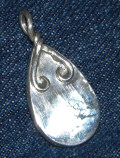
This is a piece of labradorite about half an inch wide. Most of what I have seen in silver work is actually fairly simple, conceptually. This pendant was made from three pieces of silver: a flat silver sheet for the back, a length of bezel wire that surrounds the stone, and a twist of wire for the bail. As a concept, it is simple. You cut a ribbon of bezel wire the right size for the stone and solder it to form a loop. Then you solder the loop to a flat sheet and cut it out. Lastly, you solder on a bail, polish it up, and set the stone. It really is just that simple. It is also that difficult...
First of all, you have to get the right length of bezel wire. Too much and the metal will bunch up or leave gaps around the stone. Too little and the stone simply will not fit (well, you can stretch it a little, but that is not easy). The ends of the ribbon of silver need to meet up perfectly. If you miss, there will be gaps evident at the join that will never look right. That is the easy join, too! The entire ribbon loop needs to join seamlessly with the back so you have to get the back perfectly flat and get all of the irregularities out of the ribbon that you bent into the shape of the stone. If you can see light through it, the gap is too big. Again, this is not a difficult thing but it requires a lot of attention to detail and patience. After that, it should be a piece of cake to bend a wire and solder it on as the bail, right? Sure, but you have to be careful because you are using silver solder on a piece of silver that already has two other solder joins! The first two times I tried, the bail immediately popped off in the quench due to the thermal shock on a poor join (I suspect). Every time you try to solder something, you use a flaming torch on the entire piece. You risk warping the metal or melting it into a nondescript ball. There is a Very Fine Line between "Success!" and "start over." So far, I've been lucky and only melted a few test pieces I was playing with to get a feel for the process.
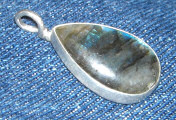 Once all the bits are soldered together there are several finishing steps that can ruin the piece if you make a mistake. The top of the bezel has to be scraped out to remove some metal os that the bezel can be pressed down around the stone. The piece needs to be polished and it is easy to lose your grip or get careless and have it snatched from your fingers by the polishing wheel. You can also mar the stone while pressing the bezel down or trying to polish it up. I was lucky, or careful, or probably both. All of the steps went smoothly and I achieved excellent results! The bezel is even and feels smooth all the way around. The stone is set firmly in place. The bail is sturdy, simple, and (I think) attractive.
I'm quite sure I can make a spider now, if I don't get too hung up on making cool, complex legs. However, the next project is going to be a chain. I plan to make some variation of the double loop chains, but I suspect it is something I will only do once. I like the creative aspect of this process, and forming hundreds of identical loops and weaving them together sounds blandly repetitive. Machines can make good chains, cheap. I'd much rather spend my time and thoughts on things that machines simply cannot do: making an original design, or setting a particular stone.